
Below are the instructions for the November 2025 Grab & Go kits! Grab one only in the Youth Department at the Library. While supplies last.
PLEASE PAY ATTENTION TO THE GRADE RECOMMENDATIONS!
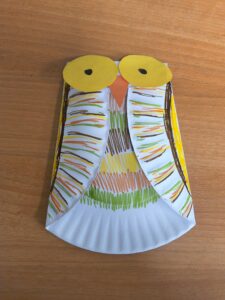
Paper Plate Owl
Each Kit includes:
- 1 paper plate
- 1 beak & feet template (orange paper)
- 2 yellow circles
You will need:
- Markers/crayons
- Glue or tape
Steps:
- Cut out the two orange feet and one orange beak.
- Color the inside of your plate (the part you would typically eat food off of). This will be the owl’s chest.
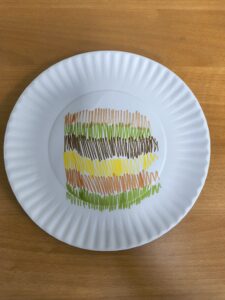
![Step 2]()
- Fold in the two sides of the plate to make wings. You can make them as big or as small as you would like!
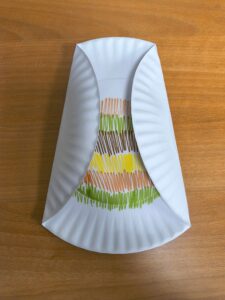
![Step 3]()
- Color the wings.
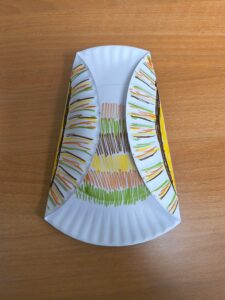
![Step 4]()
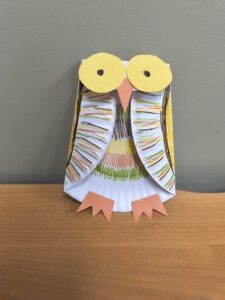
- Fold the top of the paper plate over the wings to make the head. Glue/tape on the orange beak and the two yellow circles (to make eyes).
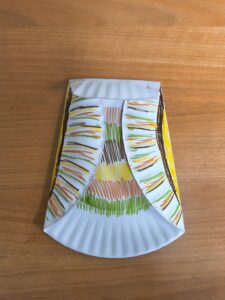
![Step 5]()
- Add a dot in the yellow circles to make them look like eyes.
![Step 6]()
- Glue/tape on the two orange feet to the bottom of your owl and add any finishing touches you would like!
![Step 7]()
Paper Plate Weaving
Each kit includes:
- A mini ball of yarn
- A paper plate
Supplies you’ll need:
- Scissors
- Other art supplies, depending on how you want to decorate your bowl
Instructions:
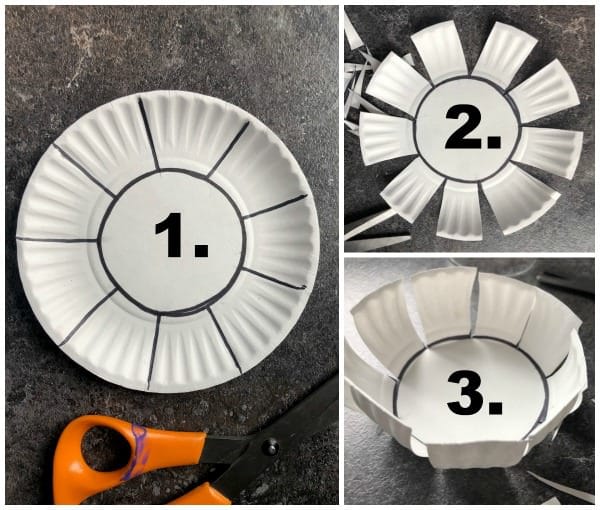
- Cut your paper plate as shown by #1.
- Cut out small triangles, as shown by #2.
- Fold in your plate tabs up to make a bowl, as shown by #3.
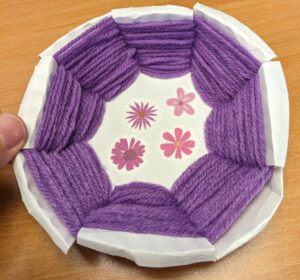
- Slip a piece of yarn between one of the cuts, leaving a tail, which you can hold down with your thumb while you get started. Weave in and out of the cuts, around and around the bowl. Once you’ve finished a few rounds around the bowl with your yarn, switch the direction and the order in which you weave through the plate pieces to make sure you cover the whole bowl evenly.
NOTE: Keep the sections of your bowl folded upwards as you weave. If you flatten them down, your weaving will not resemble a bowl.
This part is tricky! To see a video on how it’s done, check out this youtube video. - When you’ve almost reached the top, cut off your yarn and weave in a tail. Fold over the paper and you’re done!
- I chose to add stickers to my finished bowl. You can decorate yours however you’d like!
This is a great time to discuss practicing, learning persistence, and how to try again. As a knitter myself, it can be hard to learn a new skill or do a craft that takes a longer time to complete. But practice truly helps make perfect. And a wonderful thing about yarn is that you can go back and start again! If you don’t like how your craft turned out, you can pull it apart and try again.
But also, crafts don’t need to be perfect. It’s awesome you tried something new and made something!
Activity for November Teen Grab & Go: Mini Candles
Intro:
As we once again enter the darkest time of year, where night reigns and the hours of daylight grow scarce, creating even the smallest lights can have the greatest impact. Hooray! Let’s make some mini candles! Take that, the sun going down at 4pm!
Materials and Final Product Images:
This craft will allow you to make a miniature, pumpkin pie scented candle that you’ll be able to use to brighten up a room. You’ll just need a couple of materials from around the house, in addition to what’s included in the kit.
Each Kit Includes:
- 1 Sandwich bag containing Soy Wax
- 1 Paint Pot Containing Pumpkin Pie Fragrance Oil (Note: also stored in the sandwich bag)
- 1 Small Jar
- 1 Candle Wick
- 1 Wick Sticker
You Will Need From Home:
- 1 Pencil/Chopstick
- 1 Utensil for stirring
- 1 Pair of Scissors
- 1 Nonstick Pot and Stovetop (Optional)
- 1 Microwave-Safe Bowl and Microwave (Optional)
Step Paragraphs:
Step 1: Prep Your Jars!
First, a note for those of you who happened to do the Grades 5+ Grab & Go last month, and still have the decorated jar from that project– feel free to put the jar from this month inside of the jar from last month! This jar is just small enough to fit inside the other, and that will allow your beautiful leaves from last month to shine brightly, illuminated from within.
Take one piece of paper off of one side of your wick sticker, and stick it to the bottom and center of your jar. Take the other piece of paper off the top of your wick sticker, and stick the bottom of the wick (the circular, metal side) to it.
Now that the bottom of your wick is affixed, you need to do the same with the top– wrap the top of the wick around your pencil or chopstick, and center the wick in the center of your jar. Most of your provided wick will be outside the jar, and that’s perfectly alright.
Step 2: Create your Wax!
Put your jar to the side for now, and grab the plastic bag of wax out of your kit. IMPORTANT: Remove the small paint pot from the bag of wax, and place it to the side. Do not melt your fragrance oil container with your wax! Once you’ve removed the fragrance oil, it’s time to melt your wax! There are two ways you can do this.
The recommended method is to pour the wax, into a nonstick pan, on the stovetop on low heat, continuing to stir the wax until it all fully melts.
You can also heat the wax in the microwave, in a microwave safe container, pouring it into something like a small glass bowl. If doing this method, you must only heat the wax in 30 second bursts in the microwave, taking out the container and stirring the wax before putting it back in. This stops any part of the wax from heating up too much.
In both cases, once you have completely melted the wax flakes, turn off the source of the heat and allow the wax to cool for a minute or two. After the wax has slightly cooled, but not solidified, pop your paint pot open and pour your fragrance oil into the melted wax. Stir the two substances together well to ensure the fragrance binds to the wax.
Step 3: Pour your candle!
Very carefully, wearing oven mitts or some other protective tool, pour the melted wax into your jar, centering the top of the wick if it shifts. Then, put your candle to the side, allowing it to cool and harden for an hour.
After an hour (or longer, if the candle hasn’t hardened and turned opaque), unfurl your candle wick from the pencil or chopstick. Then, use your scissors to snip your candlewick to about 1/4th of an inch of length above the hardened wax (quite short) in order to prevent a too-large flame and uneven burn. Then, place your lid back on your jar, and your candle is done!
Step 4: Enjoy your Light!
Your candle is now complete, and you can light it in a safe place to enjoy its light and scent! Just remember, even with a candle this small, to never leave a lit candle unattended! That should be all, and of course, happy crafting!